The quastion is: how can we pass from geographic coordinates (latitute and longitude) to projected coordinates (UTM) with Arduino? GPS recievers usually output (or can be setup to output) their data in plain text NMEA 0183 sentences and the coordinates are expressed as geographic coordinates, i.e. latitude and longitude. More in depth the format for the latitude is ddmm. mmmm and for the longitude it is dddmm. mmmm where d=degrees and m=minutes. In an other post we will see how to convert these coordinates in decimal degrees. But what if we would like to have the coordinates expressed as projected ones?
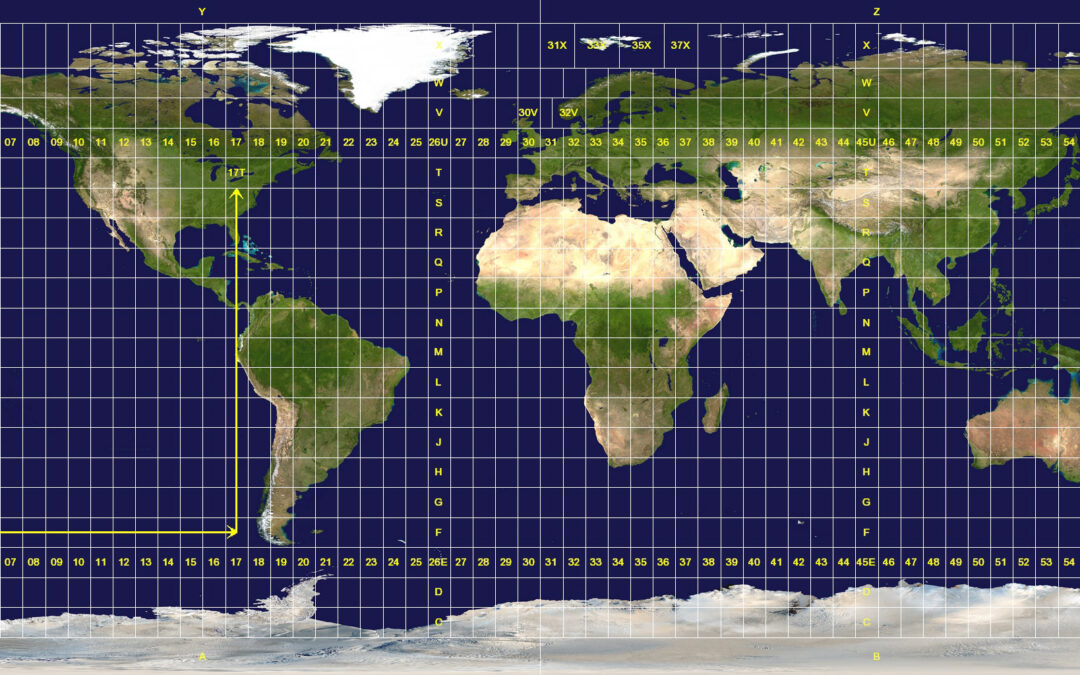
Projected coordinates are more “readable” as they are expressed in terms of cartesian coordinates: the y is the N/S coordinate and the x is the W/E coordinate. In simple terms the earth is subdivided in 60 fuses of 6° each (6° x 60 = 360°) that are projected on a cartesian plane (after the pojection the fuses are called zones). The first thing that we have to know is in what zone and band we are: e.g. 32T means that we are in the fuse 32, band T (I live in Tuscany, see picture below).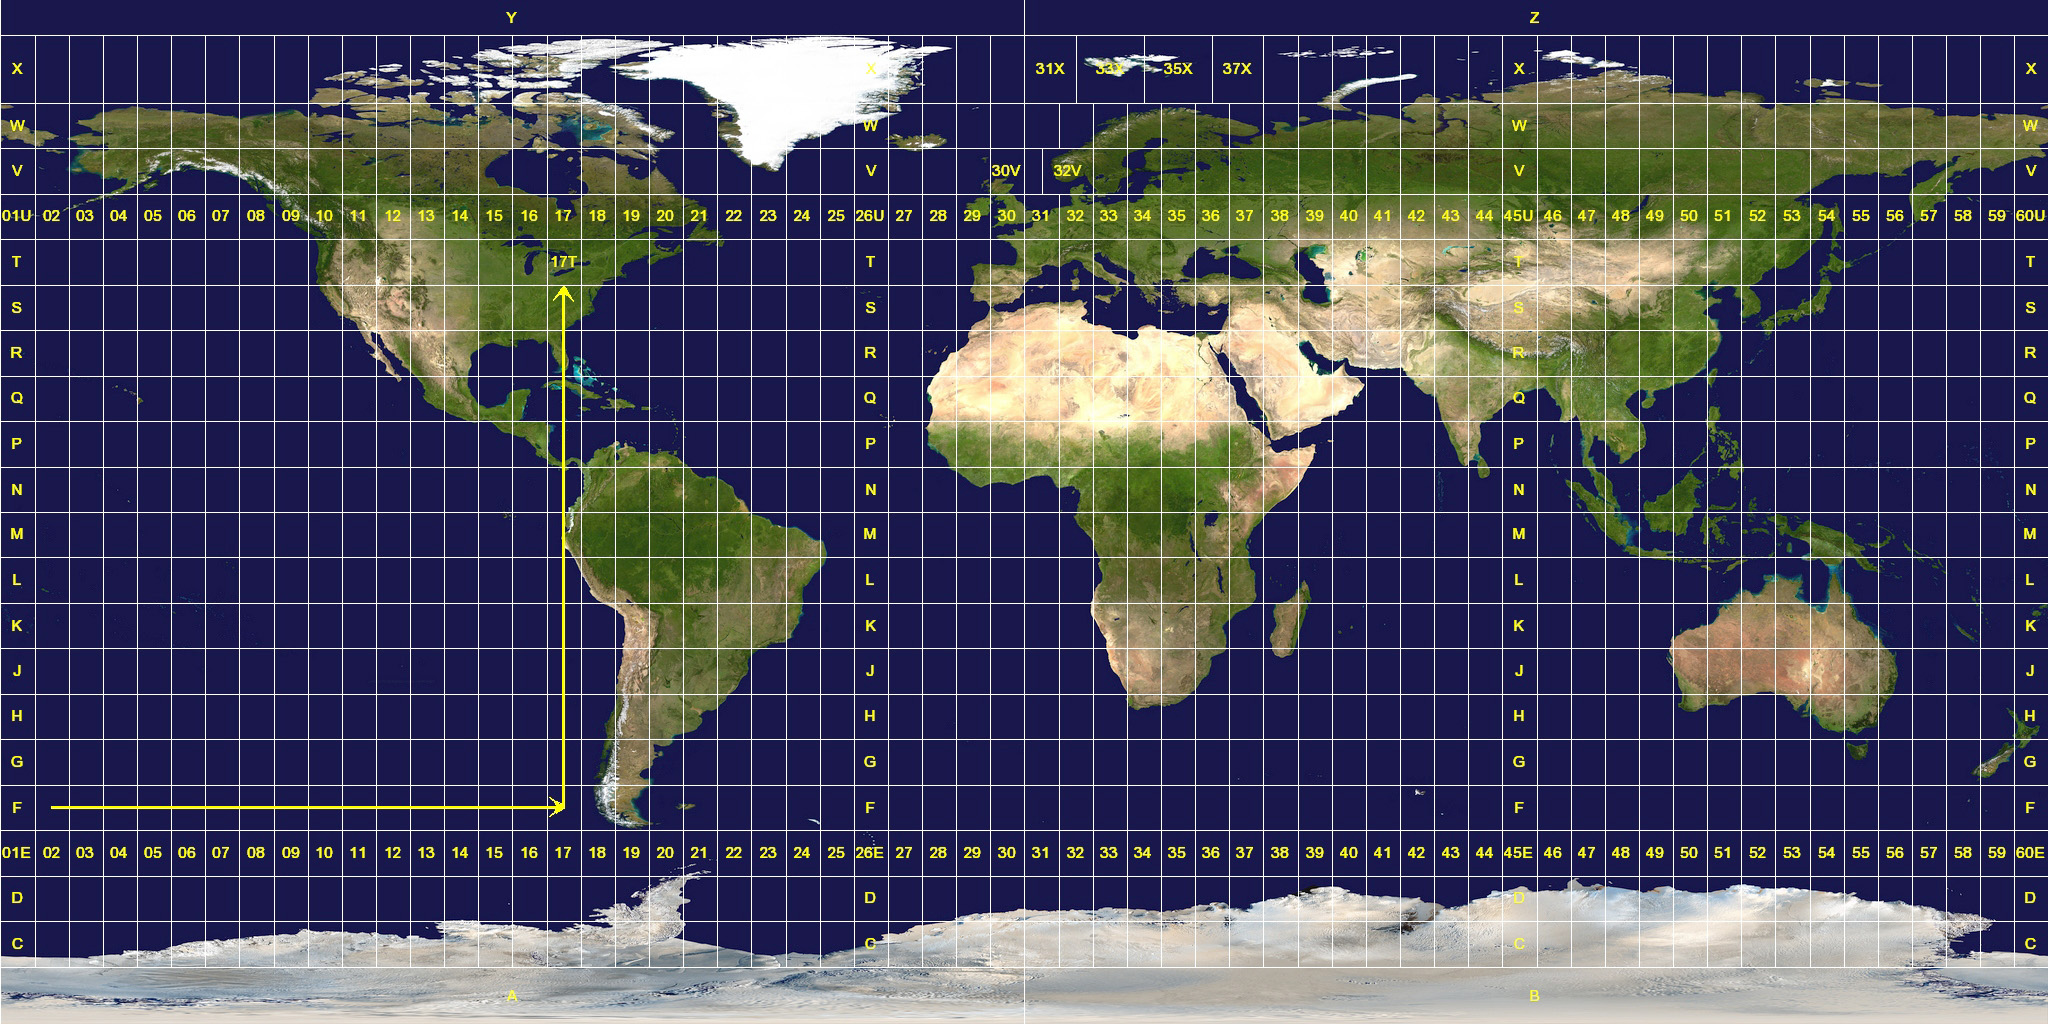
The second thing we have to know are the x and y (Easting and Northing) coordinates: these are the distances (expressed in meters in the UTM projection) from the equator for the y coordinate, and the distance (plus a false east of 500.000 m in order to avoid negative coordinates) from the central meridiane of the fuse (zone) for the x coordinate.
Now we go back to the first question: why should we use projected coordinates instead of geographic coordinates? For example because most of the trekking maps have a printed UTM grid on it and it is much more easier to find out our position on the map if our handheld GPS is set to output UTM coordinates. The pictures below is clear:
For a more in depth explanation see the MapTools link where the above pictures were taken from. Also from MapTools a very good video.
Now let’s go back to our code: the first thing I had to do was to find the formulas to pass from geographic coordinates to projected coordinates. Here is a very good explanation. Anyway a did find an Excel file that is downlodable here and I did implement its formulas in C using the Arduino IDE.
Here you can find an online UTM to Latitude and Longitude (and viceversa converter): https://www.legallandconverter.com/p44.html
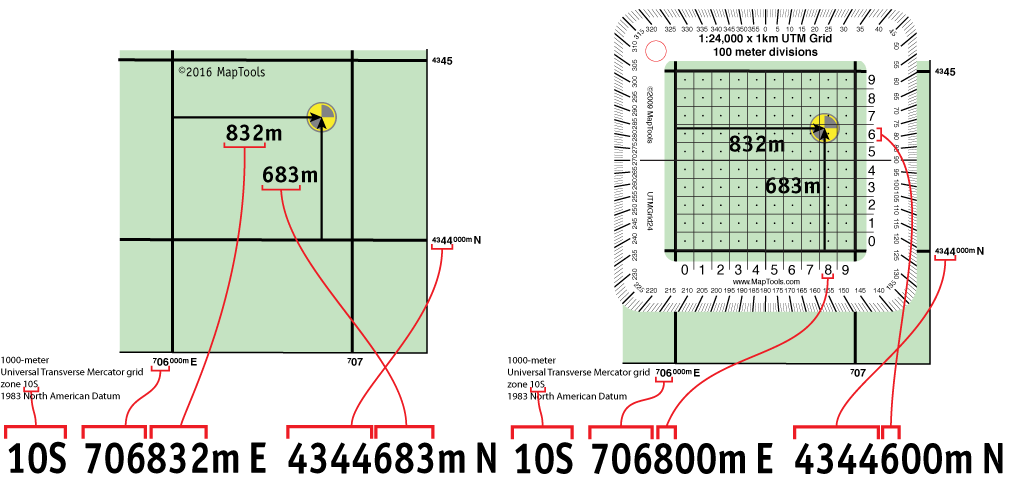
In the Arduino IDE you have to create a new sketch and then add two more tabs, one called “Band.ino” and the second one called “Calculations.ino”. Here below the main script:
/*******************Implementation of the Excel coordinates transformation file by Arkgeek***************
*************************Code written by Sebastian Schweizer for www.openvironment.net******************/

#include <math.h>

double polarradius = 6399593.626;
double ei2 = 0.006739497;
double alti;
double lati;
double longi;
double latrad;
double lonrad;
int fuse;
int centmer;
double deltalambda;
double A;
double Xi;
double Eta;
double Ni;
double Zeta;
double An1;  //actually it is A1 but this is reserved for anlalog pin A1
double An2;  //actually it is A2 but this is reserved for anlalog pin A2
double J2;
double J4;
double J6;
double Alfa;
double Beta;
double Gamma;
double Bfi;
double Easting;
double Northing;
String band;
String Hemisphere;
String GPSSentence;

void setup() {
  Serial.begin(115200);
  delay(2000);
  Serial.println("Please enter your coordinates in decimal degrees ...");
  Serial.println("use a CSV format with latitude & longitude. e.g.: 43.773833,11.294507 ");
}

void loop() {
  if (Serial.available() > 0) {
    GPSSentence = Serial.readStringUntil('\r\n');  //read until newline and carriage return
    GPSSentence.trim();
    //}
    if (GPSSentence.length() > 6) {
      int SentenceLength = GPSSentence.length();
      int comma_n_1 = GPSSentence.indexOf(',');

      String LAT = GPSSentence.substring(0, comma_n_1);
      lati = LAT.toFloat();

      if (lati > 0) {
        Hemisphere = "N";
      } else if (lati < 0) {
        Hemisphere = "S";
      }

      String LON = GPSSentence.substring(comma_n_1 + 1, SentenceLength);
      longi = LON.toFloat();

      Serial.print("Latitude is: ");
      Serial.println(lati, 4);
      Serial.print("Longitude is: ");
      Serial.println(longi, 4);

      Calculations();


      Serial.print("UTM Northing (Y) is: ");
      //Serial.println(round(Northing));
      Serial.println(Northing);
      Serial.print("UTM Easting (X) is: ");
      //Serial.println(round(Easting));
      Serial.println(Easting);
      Serial.print("Fuse and band are: ");
      Serial.print(fuse);
      Serial.println(band);
    }
  }
}
And now the code for the for the “Band” function:
void Band() {
  if (lati < -16) {
    if (lati < -72) {
      band = "C";
    } else if (lati < -64) {
      band = "D";
    } else if (lati < -56) {
      band = "E";
    } else if (lati < -48) {
      band = "F";
    } else if (lati < -40) {
      band = "G";
    } else if (lati < -32) {
      band = "H";
    } else if (lati < -24) {
      band = "J";
    } else if (lati < -16) {
      band = "K";
    }
  }

  else if (lati < 48) {
    if (lati < -8) {
      band = "L";
    } else if (lati < 0) {
      band = "M";
    } else if (lati < 8) {
      band = "N";
    } else if (lati < 16) {
      band = "P";
    } else if (lati < 24) {
      band = "Q";
    } else if (lati < 32) {
      band = "R";
    } else if (lati < 40) {
      band = "S";
    } else if (lati < 48) {
      band = "T";
    }
  }

  else if (lati < 84) {
    if (lati < 56) {
      band = "U";
    } else if (lati < 64) {
      band = "V";
    } else if (lati < 72) {
      band = "W";
    }
    if (lati < 84) {
      band = "X";
    }
  }
}
Finally the code for the “Calculations” function:
void Calculations() {
  lonrad = longi * PI / 180;
  //Serial.print("lonrad is: ");
  //Serial.println(lonrad, 5);
  latrad = lati * PI / 180;
  //Serial.print("latrad is: ");
  //Serial.println(latrad, 5);
  fuse = (longi / 6) + 31;
  //Serial.print("fuse is: ");
  //Serial.println(fuse);
  centmer = 6 * fuse - 183;
  //Serial.print("centmer is: ");
  //Serial.println(centmer);
  deltalambda = lonrad - ((centmer * PI) / 180);
  //Serial.print("deltalambda is: ");
  //Serial.println(deltalambda, 4);
  A = cos(latrad) * sin(deltalambda);
  //Serial.print("A is: ");
  //Serial.println(A, 5);
  Xi = 0.5 * log((1 + A) / (1 - A));
  //Serial.print("Xi is: ");
  //Serial.println(Xi, 5);
  Eta = atan((tan(latrad)) / cos(deltalambda)) - latrad;
  //Serial.print("Eta is: ");
  //Serial.println(Eta, 9);
  Ni = (polarradius / (pow(1 + ei2 * pow(cos(latrad), 2), 0.5))) * 0.9996;
  //Serial.print("Ni is: ");
  //Serial.println(Ni);
  Zeta = (ei2 / 2) * pow(Xi, 2) * pow(cos(latrad), 2);
  //Serial.print("Zeta is: ");
  //Serial.println(Zeta, 10);
  An1 = sin(2 * latrad);
  //Serial.print("A1 is: ");
  //Serial.println(A1, 4);
  An2 = An1 * pow(cos(latrad), 2);
  //Serial.print("A2 is: ");
  //Serial.println(A2, 4);
  J2 = latrad + (An1 / 2);
  //Serial.print("J2 is: ");
  //Serial.println(J2, 4);
  J4 = ((3 * J2) + An2) / 4;
  //Serial.print("J4 is: ");
  //Serial.println(J4, 4);
  J6 = (5 * J4 + An2 * pow(cos(latrad), 2)) / 3;
  //Serial.print("J6 is: ");
  //Serial.println(J6, 4);
  Alfa = (0.75) * ei2;
  //Serial.print("Alfa is: ");
  //Serial.println(Alfa, 4);
  Beta = 1.666666 * pow(Alfa, 2);
  //Serial.print("Beta is: ");
  //Serial.println(Beta, 10);
  Gamma = 1.296296296 * (pow(Alfa, 3));
  //Serial.print("Gamma is: ");
  //Serial.println(Gamma, 10);
  Bfi = 0.9996 * polarradius * (latrad - (Alfa * J2) + (Beta * J4) - (Gamma * J6));
  //Serial.print("Bfi is: ");
  //Serial.println(Bfi, 4);
  Band();
  Easting = Xi * Ni * (1 + Zeta / 3) + 500000;
  if (Hemisphere == "N") {
    Northing = Eta * Ni * (1 + Zeta) + Bfi;
  } else if (Hemisphere == "S") {
    Northing = Eta * Ni * (1 + Zeta) + Bfi + 10000000;
  }
}
Here a screenshot of the Arduino IDE: new tabs can created clicking on the three pioints in the top right corner:
Here you can download the code LatLon2UTM
Once you did upload the code to your microcontroller, you can input geographic coordinates via serial monitor in csv format: it will respond with the corresponding UTM coordinates.
I did some “experiments” converting six decimals geographical coordinates into two decimals coordinates (1 cm resolution) with different softwares, and here is the result (as image and as table):
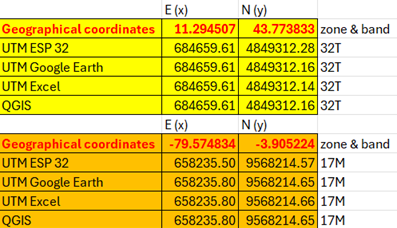
| E (x) | N (y) | ||
| Geographical coordinates | 11.294507 | 43.773833 | zone & band |
| UTM ESP 32 | 684659.61 | 4849312.28 | 32T |
| UTM Google Earth | 684659.61 | 4849312.16 | 32T |
| UTM Excel | 684659.61 | 4849312.14 | 32T |
| QGIS | 684659.61 | 4849312.16 | 32T |
| E (x) | N (y) | ||
| Geographical coordinates | -79.574834 | -3.905224 | zone & band |
| UTM ESP 32 | 658235.50 | 9568214.57 | 17M |
| UTM Google Earth | 658235.80 | 9568214.65 | 17M |
| UTM Excel | 658235.80 | 9568214.66 | 17M |
| QGIS | 658235.80 | 9568214.65 | 17M |
As you can see there are some differences between what is calculated from the microcontroller and the output of the various softwares: remebre that Arduino boards (ATmega328P microcontroller) and ESP32 microcontrollers share the same limitations for floating numbers: “The float data type has only 6-7 decimal digits of precision. That means the total number of digits, not the number to the right of the decimal point. Unlike other platforms, where you can get more precision by using a double (e.g. up to 15 digits), on the Arduino board, double is the same size as float.” Here the Arduino language reference for the datatype for floating-point numbers: https://docs.arduino.cc/language-reference/en/variables/data-types/float/
On the other hand ESP32 microcontrollers can also manage double data types. Here a comparison (results from ChatGPT) between an Arduino Uno and an ESP32:

FPU = hardware floating-point unit (FPU) = more faster